




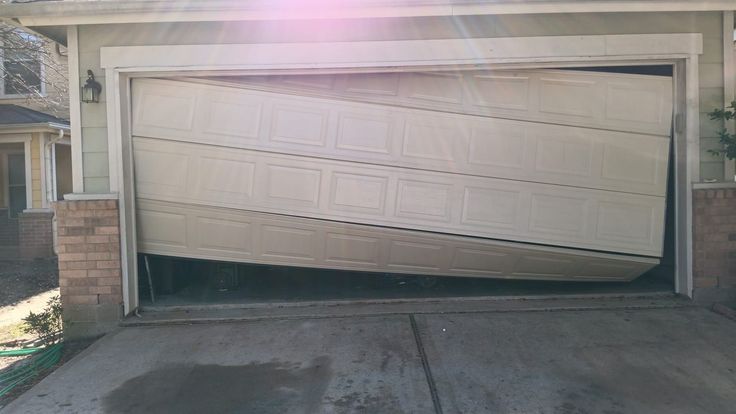
Garage door torsion springs are among the most important components of a garage door system. They help balance the weight of the door, making it possible to open and close smoothly, whether manually or with an automatic opener. However, torsion springs are also under extreme tension, which makes installation one of the most dangerous garage door repair tasks.
A properly installed garage door installation Phoenix AZ torsion spring system improves door performance, reduces wear on other components, and extends the lifespan of your garage door. This guide explains how torsion springs work, what tools are required, the installation process, and the safety precautions every homeowner should understand.
Understanding Garage Door Torsion Springs
Before installing a torsion spring, it is important to understand its purpose.
A torsion spring is mounted horizontally above the garage door opening on a metal shaft. When the door closes, the spring winds tighter and stores energy. When the door opens, the stored energy helps lift the heavy door by transferring force through cables and drums.
Main Components of a Torsion Spring System
A typical torsion spring setup includes:
- Torsion spring
- Torsion shaft
- Cable drums
- Lift cables
- Center bearing plate
- End bearing plates
- Winding cones
- Stationary cones
- Brackets
Each component works together to maintain proper door balance.
Important Safety Warning Before Installation
Garage door torsion springs store a significant amount of energy. If released suddenly, this energy can cause serious injuries or damage.
Before attempting installation:
- Wear safety glasses and gloves.
- Use proper winding bars designed for garage door springs.
- Never use screwdrivers, punches, or improvised tools.
- Keep hands and face away from spring components.
- Do not work alone.
- Follow the manufacturer’s instructions carefully.
Many homeowners choose professional installation because torsion spring work requires specialized knowledge and experience.
Tools Required for Torsion Spring Installation
If you are qualified and prepared to perform the installation, gather the correct tools.
Basic Tools
- Adjustable wrench
- Socket wrench set
- Tape measure
- Level
- Ladder
- Pliers
Specialized Tools
- Properly sized winding bars
- Locking pliers
- Vice grips
- Marker or chalk
Safety Equipment
- Safety glasses
- Work gloves
- Protective footwear
Using the correct tools is essential for controlling spring tension safely.
Step 1: Identify the Correct Replacement Spring
The first step is choosing the correct torsion spring.
Factors that determine the correct spring include:
- Door weight
- Door height
- Wire size
- Spring length
- Inside diameter
- Number of cycles expected
Using the wrong spring can cause poor balance, premature failure, or dangerous operation.
Step 2: Disconnect and Secure the Garage Door
Before working on the spring system:
- Close the garage door completely.
- Disconnect the garage door opener.
- Unplug electrical power.
- Secure the door using locking pliers on the tracks.
The door must remain completely stable throughout the process.
Step 3: Remove the Existing Torsion Spring System
If replacing an old spring, the existing tension must be released carefully.
General Process
- Insert approved winding bars into the winding cone.
- Slowly release spring tension.
- Remove the winding bars only when tension is fully released.
- Disconnect cables and remove damaged components.
Never attempt to remove a torsion spring while it is still under tension.
Step 4: Install the New Torsion Spring Assembly
Once the old components are removed, install the new spring system.
Mount the Center Bearing Plate
The center bearing plate supports the torsion shaft and helps maintain alignment.
Ensure it is:
- Properly positioned
- Securely fastened
- Level with the door opening
Install the Torsion Shaft
Slide the shaft through the spring components and bearing plates.
Check that the shaft moves freely and remains properly aligned.
Step 5: Position the Torsion Spring
Place the spring onto the torsion shaft.
Pay attention to the direction of installation.
Important Considerations
- The stationary cone must attach securely to the center bracket.
- The winding cone should face the correct direction.
- Spring placement must match the manufacturer’s design.
Incorrect positioning can prevent proper operation.
Step 6: Attach Cable Drums and Lift Cables
Cable drums transfer spring force to the garage door.
Installation Steps
- Install cable drums on both ends of the torsion shaft.
- Attach lift cables to the bottom brackets.
- Route cables correctly through the drums.
- Ensure cables sit evenly in the drum grooves.
Incorrect cable placement can cause uneven door movement.
Step 7: Secure All Hardware
Before winding the spring, inspect all connections.
Check:
- Center bracket bolts
- Bearing plates
- Cable drums
- Set screws
- Mounting hardware
Loose hardware can create dangerous conditions during operation.
Step 8: Wind the Torsion Spring
Winding the spring creates the tension required to lift the door.
General Procedure
- Insert winding bars into the winding cone.
- Wind the spring according to manufacturer specifications.
- Keep a firm grip on the winding bars.
- Make controlled movements.
The number of turns depends on the door height and spring design.
Never exceed recommended winding limits.
Step 9: Secure the Spring to the Shaft
After achieving the correct tension:
- Tighten the winding cone set screws.
- Confirm the spring is secure.
- Remove winding bars carefully.
Inspect the system before testing the door.
Step 10: Test Garage Door Balance
A properly installed torsion spring should balance the door.
Balance Test
- Disconnect the opener.
- Lift the door manually halfway.
- Release it carefully.
A balanced door should remain in position.
Problems May Include:
- Door falls quickly
- Door rises on its own
- Uneven movement
These issues may indicate incorrect spring tension.
Step 11: Reconnect the Garage Door Opener
After confirming proper balance:
- Reconnect the opener arm.
- Restore electrical power.
- Test automatic operation.
Monitor the first few cycles carefully.
Step 12: Test Safety Features
Always test garage door safety systems after spring installation.
Check:
- Auto-reverse function
- Safety sensors
- Manual operation
- Smooth movement
A garage door should operate quietly and evenly.
Common Torsion Spring Installation Mistakes
Using the Wrong Spring Size
Incorrect springs can damage the door system.
Using Improvised Winding Tools
Only approved winding bars should be used.
Incorrect Spring Direction
A reversed spring will not function correctly.
Uneven Cable Installation
Improper cable placement can cause the door to tilt.
Over-Tightening Hardware
Excessive tightening can damage components.
How to Maintain Torsion Springs
Proper maintenance helps extend spring life.
Regular Checks
Inspect for:
- Rust
- Gaps in coils
- Unusual noises
- Uneven door movement
Lubrication
Apply garage door lubricant periodically to reduce friction and corrosion.
Avoid using heavy grease that attracts dust and debris.
When to Hire a Professional
Professional installation is recommended if:
- You have never worked with garage door springs before.
- The spring system is damaged or broken.
- The garage door is unusually heavy.
- The structure requires modification.
- You do not have proper tools.
A trained technician has the experience and equipment needed to safely handle high-tension components.
Conclusion
Installing garage door torsion springs safely requires careful preparation, the correct tools, and a strong understanding of how spring systems work. Because torsion springs store powerful amounts of energy, even experienced DIY homeowners should approach the task with caution. Proper installation ensures better garage door balance, smoother operation, and improved safety. When in doubt, professional assistance is the safest choice for protecting both your home and yourself.